Recipe Requests

If anyone would like a recipe, baking tips or help with choosing the best baking equipment - please ask!


Simply follow the blog and post a comment or send me an email.

Showing posts with label done. Show all posts

Thursday, May 26, 2011

The Evolution of the First Birthday Cake

It was my daughters first birthday last week and we had a little get together for family and friends. In the days leading up we did a bunch of baking and cooking, and of course, the centrepiece of any birthday is the cake.

So here is the walkthrough of Maya's cake - it was my first crack at decorating with Regal Ice, and apart from some mild cracking hiccups and going mad with cake glitter, I reckon it turned out quite well ;)

This was carved out of a 12x9 inch basic sponge traybake. I made a template out of a piece of paper and cut around it when the cake was cool, leaving as much cake as possible. Basically it was cut through to fit as much cake as possible on the cakeboard.

Smeared with jam and rolled out the Regal ice. If you make any kind of mistake with Regal ice you can dab some water on it and rub out the mistake with your finger. Do it lightly, but the icing wll bind together. Its very forgiving stuff.


Once the icing was done, I fitted a ribbon around, and again it is sealed with a dab of water on the back - this glues the ribbon to the icing without any marks. Genius, huh?

I got some cheaty little flowers from Hobbycraft already made. A little dab of water on the back and then stuck all over the cake. Place them out the way you want then before gluing in place.

Canny! I finished by cutting "Maya" with letter cutters into icing and decorating the board.

And now for the alternative, ugliest but lovely tasting birthday cake -

This one was for the ice cream ;) Malteaser cake.

Saturday, March 26, 2011

Its Brownie Time

Im doing a half batch at the request of my hubby. Havent made them in a while, so will let you know how it goes.

The oatmeal raisin cookies are waiting for the brownies to finish using the oven.

I need a bigger kitchen.

Pics to follow.

Sunday, March 13, 2011

Apple cake revival

Its in the oven. Last time it was a total disaster - I am blaming the fact that I didnt have the right size tins and the whole thing just would not cook right.

I have a new tin.

If it goes wrong this time then its on my head ;)

I will keep you posted.

Tuesday, March 08, 2011

Malty Overload

Been having a wonderful time making malt cakes. Made a huge cupcake one for a friends birthday the other day and it was so good I decided to make a pure chocolate cake last night and dress it with malt icing.

Thats after a batch of little malt cupcakes were made and decorated too.

Goes best with very, very, VERY strong cawfeeeee!

Sunday, December 12, 2010

Tablet!

It wouldnt be Christmas without it - lovely, sugary tablet that melts in the mouth and gives you a ridiculous sugar rush. I have used the recipe from http://www.scuss.com/ - here it is! Turned out really well for a first go, although I did end up with the obligatory boiling sugar burn on my finger. I made vanilla sugar in August, and it has been used here.

Its fantastic. If I dont mind saying so myself...


Ingredients

  • 1kg white cane vanilla granulated sugar
  • 1 tin (appx. 400g) sweetened condensed milk
  • 100g unsalted butter
  • fresh milk to damp sugar

Notes on ingredients

Sugar
I prefer cane sugar, as beet sugar can make the tablet taste a bit like turnips. Unbleached sugar works well too, but causes little crystals of dark molasses to settle out. Aunt Celie's recipe didn't add any flavouring, but I've found that vanilla makes it just that bit better. If you don't have time to make vanilla sugar, skip the added flavour altogether. It'll taste almost as good, and far better than synthetic vanillin would.
Condensed milk
This is whole milk that has been heavily sugared, and boiled down to a thick, slightly caramelized, sticky liquid. Evaporated milk (the same, but unsweetened; as used in coffee in the Netherlands) doesn't give as good results.
Butter
This has to be unsalted, of the highest quality, and no margarine can be substituted. This recipe is so high in calories that you'd be wasting your time trying to save any by spoiling the taste.

How to make vanilla sugar

Simple, but time-consuming: Bury a dried vanilla pod deep in a bag of sugar. After a week or two, fish the pod out. The vanilla sugar is ready; you should be able to smell the flavouring from outside the bag.
Vanilla pods, though expensive, can be reused many times. They are worth it for the subtle flavour they impart.

Equipment

  • large pan, not non-stick
  • big wooden spoon
  • glass of cold water
  • teaspoon
  • plate, as spoon rest and tester for mixture colour.
  • large shallow baking tray, carefully buttered.

Method

The mixed ingredients before heating
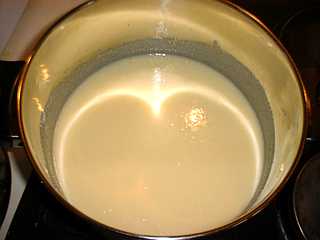
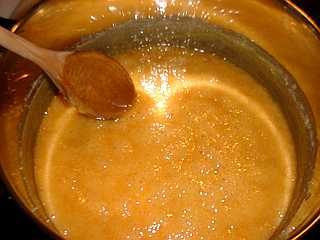
Damp the sugar with cold milk in the pan. Add the butter and the condensed milk, and turn the heat on medium-high.
It's an idea to put a little dollop of the uncooked mix on the spoon rest plate. I find comparing the colours of the mixture as it cooks a better way of judging readiness than using a sugar thermometer.

The colour of the mix just as it boils
Keep stirring evenly until the mixture comes to the boil; this usually takes about ten minutes. If you start getting brownish streaks (caramel), turn the heat down a little, and keep up the stirring effort. If you get black streaks, you've burnt it. Good luck with cleaning the pan …


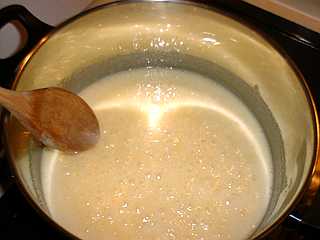
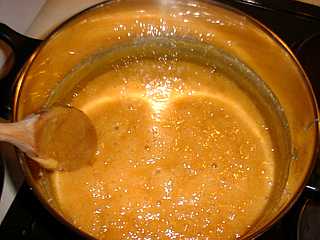
Once the mixture boils, turn the heat down low. Stir occasionally to stop the mix sticking. When it's simmering, the mix can be more than twice its original volume, so let's hope you've chosen a big enough pan.

Boiling for 6 minutes; slightly darker
You'll notice the mixture darken slightly; keep stirring now and then. It'll take about 20 minutes for the mix to cook.

Forming a sticky glob in cold water; nearly ready!Boiling for 13 minutes; darker still
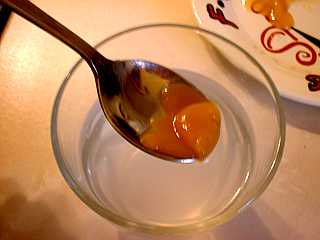
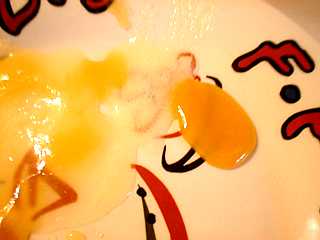
Transfer a little of the hot mix to a teaspoon, and plunge it into cold water. It should form a soft, sticky ball that should drip off the spoon very slowly. When it does this, it's ready.
(I'd like to add that the goo on the spoon is very tasty, but be advised that it keeps its heat inside the glob. You can burn your tongue quite remarkably. Beware!)

Ready after 18 minutes; golden brown
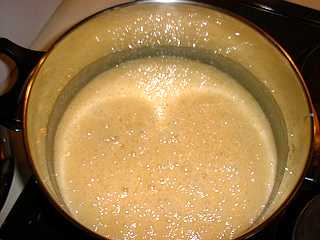
Ready! I like my tablet a light colour, so it's usually done in twenty minutes or less (this took 18 from coming to the boil). If you prefer a stronger flavour, simmer for longer.
Now comes the difficult bit. Take the pan off the heat, and start stirring vigorously. Try to mix in some of the crystallized mixture that has formed on the side of the pan; what we're trying to do is to get the mixture to form large enough crystals that it will set, but small enough crystals that it will still pour. Once you feel the spoon stirring slightly grittily on the base of the pan, and the mixture being slightly stiffer, it's ready to pour.
The above is much harder to explain than to do; you'll know it when you feel the change. Of course, let it set too long or too fast, and you'll end up with a trayful of gritty lumps looking alarmingly similar to a cat box.

Setting in the tray
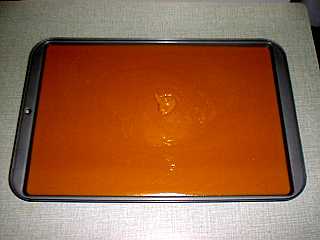
Quickly pour the mixture into the buttered baking tray, which should be on a heat-resistant surface. Scrape out as much of the mixture as you can, as it will set in the pan to concrete hardness, and someone will just have to eat what's left in there.

Colours of uncooked mix (middle) with cooked (right)
Here's the colour change, from uncooked mixture (cream coloured, in the middle -- almost the same colour as the plate) to the final colour, which is a golden fawn brown.


Don't be alarmed if you see little crazed patterns appearing on the surface as the tablet cools. It's just the sugar crystallizing.
Once the mixture has fully cooled and set (usually overnight, if you can keep your paws off it that long), slice into bars or small chunks, and give it to your friends. If they weren't your friends before you gave them tablet, they will be afterwards.

Notes on the recipe

  • I damp the sugar with about ½ cup milk. The amount isn't critical; too little, and you risk burning the mix. Too much, it just takes a while to boil off.
  • 1kg of sugar is about 5½ cups.
  • 100g butter is about 4/5 of a stick.
  • Crystals forming as it coolsI now use a 310×480mm (I think that's 11×19") large cookie pan for setting. It fills nicely, and makes nice thin slabs.
  • My dad, probably one of the greater connoiseurs of Great-Aunt Celie's tablet, takes issue with my use of vanilla. He says that she never used vanilla, and that's what made it special. Feel free to miss out the vanilla if you want the authentic experience.
  • Though I say not to use a non-stick pan to boil up the mixture, don't go out and buy a stainless pan just for this.
  • A hint from my dad: If you've dried your throat out by eating tablet, but still want to eat some more, eat a tangerine! It magically clears your throat, and sets you up to eat plenty more.
Not part of a calorie-controlled diet.

Saturday, December 11, 2010

Christmas List

I have been good this year.

Im asking Santa for a bunch of cookbooks.

Found some great ones - Kitchen  looks to be Nigella's magnum opus so that has to be done. Apart from my love affair with Mary Berry's Baking Bible, the Domestic Goddess book is my favourite baking book (why dont they make lamenated cookbooks so that they splashes from the actual process of cooking can be wiped away? I lost the sticky gingerbread recipe due to the pages being stuck together with icing sugar..). it was also the first real book that got me into comfort food baking.

Martha Stewarts cupcake / cookie books look fantastic too. There is a fantastic idea to make a clock out of cupcakes for New Year. I wouldnt have thought of that in a million years, even though a cupcake tray is very convieniently (almost auspiciously) grouped into twelves... OK, so sometimes I not so smart.

Mary Berry's ultimate cake book - over 200 recipes for every kind of cake imaginable. It has to be gotten.

The Primrose Bakery cupcake book looks sweet (no pun intended) and its only a fiver in The Works.

And now we get to equipment. I am after a bannon (sp) for baking bread, and a linen baguette prover thingy. You know what I mean - you rest the baguettes before baking in this purpose built linen cloth moulding.

Found a biscotti tin in TK Maxx that was worth getting too. Gradiated sides. Professional. Obviously could be used for way more than just biscotti.

I am enjoying the barista machine I got for my birthday too. have cracked how to do caramel macchiatos and a bunch of lattes as well as the standard americano. Its one of those kitchen deelies that has saved a bunch of cash in the long run. As silly as it sounds, we dont go to our local Starbucks anywhere near as much as we did - because we have the syrups in and can make the coffee ourselves. Costco carries 'Bucks espresso beans and Makro carries the syrups. Get both in bulk and you are quids in.

Well I will wrap this up - thats all for now. If anyone knows of anything that should be on the list and  missing out, then let me know ;)

Thursday, December 09, 2010

Its that time of year again...

Time to bake some mince pies!

To be honest, I usually cheat at this - and this year is no different. I got some Jus-Roll sweet shortcrust, some M&S mincemeat (they have both Classic and Chocolate varieties this year.) and went about the job of assembling the pies.

Take a cupcake tin, a 2 1/2 inch cutter, roll out the pastry and cut out the rounds. Put the rounds straight into the tin, no prep needed as they will shrink back from the sides when they are cooked. Fill with your desired mincemeat and top with a festive patry cut out - I use star cutters. Egg wash and bung in the oven for 25 minutes on a moderate heat until the patry is golden brown.

Nomnomnom!

Mince pies for everyone!

Saturday, October 09, 2010

Cakey Disaster

Well it happens ever so often...

I finally got into the kitchen today after a busier-than-usual week doing DIY stuff. I have missed baking. Its such a chill-out activity for me, I can gather my thoughts and focus on each operation of the process. Its a clarity of mind thing.

Anyway, I knocked together a batch of traditional gingernut biscuits to start off, just because there were only a couple of hobnobs left in the packet and you NEED biscuits to live. They are an old favourite, so its a no-brainer when it comes to process. I make them extra gingery and add some cinnamon because thats the way we like it, even though its not part of the recipe.

As I was doing this our next door neighbour who we have been plying with free eggs from our hens, showed up with two massive bags of Bramley apples from his tree. So a Devonshire Apple Cake was decided to be the first option to use some of the apples. I have been meaning to have a go at this cake for a while and have been hanging out and waiting for the apples to start dropping.

So - get the mix together. Its a standard cake mix - flour, eggs, fat, sugar - add some chopped walnuts and sultanas and blitz in the mixer for a couple of minutes. No problem. Grate apples. Prep tim. All the usual stuff. No real difficulty here. Pour in half the mix. Spread out the grated apples and dust with cinnamon. Put on other half of mix.

Dont have the right size cake pan. Oh dear. What a time to find this out. Still, its only an inch under what the recipe calls for so I figure it will be fine. Hm.

The cake goes in and is set for and hour and a quarter. The buzzer goes and I peek in. There is cake mix all over the floor of the oven and down the sides of the pan. Bugger. No worries, so it wont look too good, but at least it should taste nice. I try with the tester and it comes out clean. So out it comes and starts to cool on the wire tray.

After doing a bunch of other stuff (including prepping some raw horseradish from the garden which I will talk about later), making pizza dough and bathing the baby. I come downstairs, have dinner and we are going to have cake and tea as dessert. Slice into cake. Big gooey mess of a cake.

Right now we are about three hours after I starting making the thing and its only just come out of the oven. So either the cooking time is off or the oven is on the blink.

There are some pics to follow, but hopefully it will at least taste nice and be fully cooked by now.

Keep your fingers crossed ;)

Sunday, October 03, 2010

Quiche Construction

When I think Baking I usually go straight to the sweet side of it. Cakes, biscuits and even sweet breads, so I thought I would shake up a bit and put down a savory bake - starting with something simple, a quiche.

They really don't take a lot of thought to stick together, and its more a matter of assembly and construction than it is measuring and mixing.

Its helps if you have your own hens, and a ridiculous amount of good, free-range eggs that need using up, but thats just me.

Basics - use a roll out pastry. Yes its a cheat.


Assemble what fillings you would like. In this one I did a basic ham, onion, sweet pepper and cheese.


Beat the eggs  and add some milk to dilute. If you have some cream, chuck that in too. This pie dish was about 8 inches across, and I used half a dozen eggs.

Construct - layer the onions, ham and pepper (or whatever fillings you are using) in the pie dish and cover with the eggy mixture. Top with cheese and a few twists of black pepper, and perhaps some herbs of your choice.

Bake in a medium oven until it is done. Its done when the egg has "set" - you can test by lightly shaking the pie dish - if the egg looks runny then it isnt quite finished.

It should last around three days.

Have fun!

Thursday, September 30, 2010

The Great Sourdough Experiment - Part II

Hmmm.

I have done better. But here is the next stage.

Last time we had the started just, ahem, starting.

After five days of feeding, watering and talking to the jug of yeasty batter it was pretty much ready to use.

So this happened next -


Pretty active stuff...

Once it was like this I measured out about 300g as I wanted a big loaf, and make up the same amount of bread flour. Add a bit of salt and add any watere needed to make a shaggy, decent-feeling dough.


Next knead the hell out of it for a few minutes.


Once that lovely elastic feeling comes to the dough, put it in an oiled bowl, cover with clingfilm and put somewhere warm overnight to prove.

The next day punch it down, knead it for a couple more minutes and press out into the desired loaf pan. The white one is on the left, the malted one on the right was the leftover started I had and decided to finish it off with this loaf.

Leave somewhere warm (I put mine next to the TV..) for two hours. Or until it has filled out a bit more.


Bung in the oven for 45 mins - 1 hr depending on the size of the loaf. Basically until it sounds hollow. High heat, mines a fan oven and it goes in at 200 degrees, a conventional one will be around 220, which I think is gas mark 7ish.


Ta Dah!

It hasnt risen as much as I would have liked, but Im still learning with this. So far my bread is very hitty-missy, and although this one was a tad flat, it tastes good! V tangy and full.

Have fun!


Sunday, September 26, 2010

Today's Dabbling

I love Malteasers. And I love Malteaser cake. So I adapted the recipe and made Malteaser cupcakes! Bize sized loveliness..


I made a batch of traditional gingernuts too as we were out of biscuits. These are so easy to do, take about twenty mintutes to make - and that includes baking time.


The Sunday roast is about to do in - but that is the hubby's duristiction and then I will be reporting on the Grand Sourdough experiment - part deux. The starter is ready!

If anyone would like one of my recipes, please feel free to ask!